Ring tensile test of tubes
Ring tensile test of tubes
A method for a ring tensile test of tubes to reveal surface and internal defects.
Purpose of Ring tensile tes
By subjecting the test piece to strain until fracture occurs. This test may also be used to assess the ductility of tubes.
The ring tensile test is applicable to tubes having an outside diameter exceeding 150 mm and a wall thickness no greater than 40 mm. The inside diameter shall be greater than 100 mm.
Principle of Ring tensile test
Subjecting a ring cut from the end of a tube to strain in the circumferential direction until fracture occurs.
Apparatus of Ring tensile test
Two circular pins, of equal diameter with parallel axes, and movable in relation to each other while still remaining parallel.
In principle, the diameter of the pins shall be the minimum permissible from strength considerations but, provided that the inside diameter of the tube allows, should be at least 3 times the wall thickness of the tube to be tested (see figure 1).
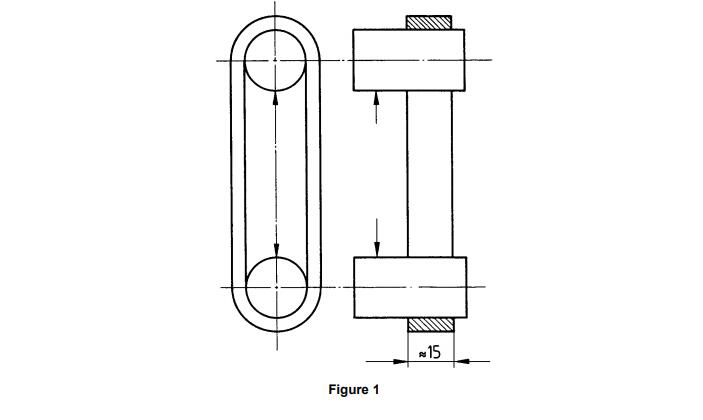
Test piece
1.The test piece shall be a ring cut from the tube with the end faces perpendicular to the axis.
2.The length of the test piece (width of the ring) shall be approximately 15 mm. If the thickness exceeds 15 mm, the length of the test piece may be equal to the thickness.
3.The ends of the test piece shall be free from burrs. The edges may be rounded by filing or chamfered by other
NOTE — Non-rounded or non-chamfered edges are permissible, if the test result meets the test requirements.
Procedure of Ring tensile test
1.In general, the test shall be carried out at ambient temperature within the limits of 10 °C to 35 °C. The test carried out under controlled conditions shall be made at a temperature of 23 °C ± 5 °C.
2. Place the ring cut from the tube over the pins. Subject the ring to strain by moving the pins away from each other at a specified rate until it fractures. In cases of dispute, the rate shall not exceed 5 mm/s.
3.Interpretation of the ring tensile test shall be carried out in accordance with the requirements of the relevant product standard. When these requirements are not specified, the test piece shall be considered to have passed the test if no cracks are visible without the use of magnifying aids.

