Duplex Stainless Steel Processing and Manufacturing (3)
Practical guide for duplex stainless steel manufacturing (3)
The application of duplex stainless steel is becoming more and more extensive, and users are more and more familiar with this type of stainless steel. This article focuses on one of the difficulties of duplex stainless steel application-processing and welding, introduces the various characteristics of duplex stainless steel, and gives the basic principles and practical information for processing and welding duplex stainless steel.
Contents include: history, chemical composition, metallurgy, corrosion resistance, mechanical properties, physical properties, technical conditions, quality control, cutting, forming, welding, and applications of duplex stainless steel.
The full text is longer and will be published in several parts. Welcome to pay attention!
6 End user technical requirements and quality control
A key practical issue in the technical requirements and quality control of duplex stainless steel manufacturing and processing is the maintenance of performance after welding. The composition and process of the original supply of duplex stainless steel must ensure good performance after welding (using a qualified welding process).
6.1 Standard test requirements
6.1.1 Chemical composition
The ASTM or EN standard is a more appropriate starting point for selecting the second-generation duplex stainless steel. The addition of nitrogen to duplex stainless steel is advantageous, not only to avoid excessive ferrite in the heat affected zone, but also to make the material have better metallurgical stability. The upper limit of the nitrogen content of duplex stainless steel is the solubility of nitrogen in molten steel, which can be reflected from the maximum value of the nitrogen content range specified by the standard, but the minimum nitrogen content listed does not necessarily reflect the nitrogen content required for optimal welding characteristics. . For example, the original grade S31803 of 2205 duplex stainless steel.
When the nitrogen content of S31803 is in the lower limit of its allowable range of 0.08% to 0.20%, the effect of 2205 after heat treatment and welding is not ideal. Practical experience shows that for the welding process of 2205 duplex stainless steel, "the minimum nitrogen content is 0.14%" is necessary. Since this condition is often specified, the S32205 version of 2205 is introduced into the duplex stainless steel standard for the convenience of end users who need to weld. Super duplex stainless steel also has a higher nitrogen content range, which reflects people's understanding of the importance of nitrogen content.
The technical conditions of duplex stainless steel that some end users rely on are based on the "PREN" relationship. Although the PREN value may be effective in ranking the corrosion resistance of different grades with a balanced composition in a family, changing the composition to meet a specific PREN value may not necessarily achieve a proper metallurgical balance. The PREN value helps people choose one of a series of grades. When used to adjust the composition of a certain grade, it seems that chromium and molybdenum can be replaced by nitrogen, but from the perspective of metallurgy, chromium and molybdenum promote ferrite The bulk and intermetallic phases are formed, while nitrogen promotes the austenite phase and prevents the formation of intermetallic phases.
Therefore, it is best to select the composition of duplex stainless steel according to the standard grades listed in the specification. It is possible that each grade limits the upper limit of nitrogen content. Regardless of the composition of the material, it should be the same as the material used in the welding procedure qualification, so that the evaluation is meaningful for the expected results of processing and manufacturing.
6.1.2 Solution treatment and quenching
In addition to the chemical composition, the actual heat treatment conditions of the rolled material are also important for welding. The purpose of austenitic stainless steel annealing is to recrystallize the metal and dissolve the carbon into the solid solution. Low-carbon stainless steel with "L" can be relatively slow in water quenching or air cooling because it takes a long time to reform harmful carbides. However, for duplex stainless steels, even with an ideal nitrogen content, staying in the critical temperature range for a few minutes is also detrimental to its corrosion resistance and toughness. When the rolled material is cooled slowly, the time that the material passes through the temperature range of 700 to 980 °C (1300 to 1800 °F) no longer allows further heating such as welding, so it is left to the welder to weld the weld zone without the intermetallic phase of the heat affected zone. Less time.
Although standards such as ASTM allow certain duplex stainless steels to be "water quenched or rapidly cooled by other methods", the optimal metallurgical conditions for welding are obtained by quenching from the annealing temperature most quickly. However, this ignores the deformation and the increase in residual stress caused by water quenching. For thin plates, air cooling is highly efficient in modern coil production lines; but for thick plates, water quenching can obtain the best metallurgical conditions for welding. Cooling the sheet or component to 700-980°C (1300-1800°F) before quenching will result in the formation of intermetallic phases.
Another way to ensure optimal starting conditions is to require inspection of the products of the rolling mill to ensure that there are no harmful intermetallic phases. ASTM A 923 (Standard Test Method for Intermetallic Phase Detection in Duplex Austenitic/Ferritic Stainless Steel) Use metallographic examination, impact test or corrosion test to prove that intermetallic phase has not reached harmful levels.
This test only considers whether precipitation of harmful phases has occurred. The EN standard does not include similar test procedures. Using this test can prove that the rolling process ensures that no harmful intermetallic phases are formed during processing. This test is similar to ASTM A 262 (Standard Practice for Detecting Intergranular Corrosion Sensitivity of Austenitic Stainless Steels) or EN ISO 3651-2 (Determination of Intergranular Corrosion Resistance of Stainless Steels-Part 2: Ferrite, Austenitic and Ferrite-austenitic (duplex) stainless steel-corrosion test in sulfuric acid-containing medium) to check whether austenite stainless steel is sensitized by chromium carbide.
The ASTM A 923 standard covers only 2205 (S31803 and S32205), 2507, 255 and S32520, but other duplex stainless steels may also be included in the future. Many manufacturers use these and similar tests and other acceptance criteria as part of the welding procedure qualification.
6.2 Special test requirements
6.2.2 Tensile and hardness test
Compared with austenitic stainless steel, duplex stainless steel has high strength, but occasionally there are end user technical requirements that specify both the strength and the maximum hardness. The introduction of the maximum value of strength or hardness may be based on the experience of martensitic stainless steel. The high strength and hardness of martensitic stainless steel come from martensite that has not been tempered. However, the duplex stainless steel does not form martensite during cooling. The high strength and hardness of the duplex stainless steel are due to its high nitrogen content, the duplex structure itself, and the work hardening that may occur during forming or straightening operations.
The hardness test may be an effective means to prove that there is no excessive cold working in the process; but when the hardness test is used for this purpose, it is important that the measurement position should be between the surface and the center of the section, rather than when local hardening and Surface hardened on the surface.
6.2.2 Bending test
The bending test can prove that the products of the rolling mill have no rolling cracks, but it may be difficult for large-scale materials, small-rolled products or certain geometric shapes. The bending test is not a conservative indicator of the quality of duplex stainless steel, because the bending point may be inconsistent with the location of the unqualified situation. Due to the directionality of the bending, certain conditions such as the centerline intermetallic phase may not be detected.
The bending test is generally used as part of the austenitic stainless steel welding procedure evaluation, because the weld has the risk of thermal cracking, especially for the severely restricted weld structure with high austenite phase content.
Due to the presence of ferrite crystals and higher thermal conductivity and lower thermal expansion, duplex stainless steel greatly reduces the role of bending tests to detect weld integrity problems. If the test location coincides with the affected area, the bending test may roughly detect too much ferrite, but the bending test may not detect a small amount of metal that is harmful to the corrosion resistance and toughness of the finished product Phase of existence.
6.2.3 Impact test and metallographic inspection to detect intermetallic phase
There are two ways to specify materials and assessment processes using impact tests:
Test under known conditions to detect unqualified materials, such as the presence of excessive ferrite or intermetallic phases;
Prove that the characteristics of the processed products fully meet the expected use requirements.
For the first application, ASTM A 923 gives the test method for 2205 duplex steel. ASTM A 923 Method B describes the reduction in toughness. The standard longitudinal Charpy test (Charpy) at -40°F/°C impact test has a toughness of less than 54J (40ft-Ib) indicating that the annealed product of the rolling mill is unacceptable.
In order to ensure satisfactory heat treatment and quenching, as a means of production control, each batch of rolling mill products should be tested according to A 923 Method B (or Method C, corrosion test). ASTM A 923 allows the use of metallographic examination (Method A) as a screening test for acceptance rather than rejection. Because the operation of Method A requires a high level of metallographic techniques, it is prudent for users to request Method C corrosion tests instead of metallographic inspections. The method for proposing this is to report the corrosion rate.
One benefit of ASTM A 923 Method A is that the centerline intermetallic phase can be confirmed, as shown in Figure 7 of ASTM A 923. According to the screening method of Method A, the centerline intermetallic phase will cause the material to fail, but the result of the impact test of Method A 923 Method B is not necessarily that the material is rejected. Since this centerline intermetallic phase may lead to delamination of medium and heavy plates during forming, hot shearing, or welding, users should request inspection of method A in addition to method B or C, and reject any display of centerlines Material of intermetallic phase. Although ASTM A 923 has stated that Method A is not used for the rejection of materials, it allows end users to impose stricter requirements. If the material exhibits the centerline intermetallic phase near the middle of the thickness shown in Figure 7 of ASTM A 923, it should be rejected.
The second use of the impact test is to evaluate the base metal (base metal), fusion zone and heat affected zone under more severe conditions than expected, which may be a cautious and cost-effective method. For the evaluation of welds, the test temperature and qualification criteria must be specific to the type of welding and related to the conditions of use. The toughness will not be as high as the solution-annealed duplex stainless steel rolled product. The lower toughness of the weld metal does not necessarily indicate the presence of intermetallic phases, but is often caused by the increased oxygen content, especially the use of flux protection welding processes.
ASME has issued new technical requirements for duplex stainless steels with a cross-section thickness greater than 9.5 mm. These requirements require the Charpy impact test at or below the metal minimum design temperature (MDMT), and the initial expansion is used to prove the initial The toughness of the base metal and product welds is sufficient to meet future use requirements. The difference between the ASME test and the ASTM A 923 test is that the ASME test requires that the Charpy impact test include three specimens (the more commonly used method for measuring the toughness is applicable), and requires the reporting of minimum and average values. ASME requires that each batch of parent metal and filler material be tested for parent metal, weld metal and HAZ.
In order to save and obtain cautious results at the same time, the lower one of the two test temperatures (ASTM A 923-40°C/F or the minimum metal design temperature MDMT in the ASME standard) can be used by measuring the impact energy of three samples And side expansion to measure its toughness.
6.2.4 Metal phase or magnetic method to determine phase equilibrium
The austenite-ferrite phase balance of duplex stainless steel rolled products varies little between furnace number and furnace number or batch number and batch number, because the chemical composition in production is controlled in a narrow range, and The annealing operation is clearly defined. Generally, 2205 dual-phase steel contains 40% to 50% ferrite, so the value of the phase balance of the annealed rolled material is limited.
However, the determination of the ferrite content is suitable for evaluating the welding process, which can prevent excessive ferrite in the heat affected zone. Accurate determination of the phase balance of duplex stainless steel usually requires the use of metallographic examination and the number point method, such as ASTM E 562 (manual) or E 1245 (automatic) method. Because duplex stainless steel is ferromagnetic, the distance between austenite and ferrite is extremely fine. If there is no metallographic measurement result with the same geometry and phase balance as a reference standard, the reliability of the magnetic detection method is limited. AWS A4.2-91 and EN ISO 8249 (Welding-Determining the number of ferrite (FN) in austenitic and duplex ferrite austenitic Cr-Ni stainless steel welding materials) describes the process of calibrating the magnetic measuring instrument , Measure the ferrite at the duplex stainless steel weld and report the result as the number of ferrite FN. The range of qualified weld phase balance is much wider than the parent metal. If the toughness and corrosion resistance of the weld and heat affected zone are acceptable as shown in the ASTM A 923 test, then the ferrite range of 25% to 75% can provide the required characteristics of duplex stainless steel. Magnetic measurement shows that the ferrite number is between 30 and 90.
Requires the determination of the phase balance of materials that have been placed in the processing service center or dealer warehouse. It will cost more than the same requirements for the materials just produced from the rolling mill, obtain samples and conduct separate tests It may also affect timely delivery.
Because the intermetallic phase is non-magnetic, the magnetic test cannot be used to detect the s and c phases.
6.2.5 Corrosion test
Corrosion testing of solution-treated rolled products in accordance with ASTM A 923 Method C is one of the most cost-effective methods for detecting hazardous conditions. The precipitation of intermetallic phases and the possible presence of chromium nitride in the ferrite phase can be detected as a decrease in pitting corrosion resistance.
These phases cause the critical pitting temperature (CPT) to be 15°C or more lower than that of normally annealed materials. Determining the actual critical pitting temperature of the sample is expensive because it requires multiple tests on a single sample in accordance with ASTM G 48 or ASTM G 150. However, a single corrosion test (ASTM A923 Method C) at a temperature 10 to 15°C lower than the usual critical temperature of duplex stainless steels will reveal the presence of harmful phases. When a corrosion test is used to detect the presence of harmful phases, any pitting on the front or sides and edges should be used as the basis for rejection. Although the edges may not contact the medium in actual equipment, the purpose of the test is to detect intermetallic phases, and they are more likely to appear on the centerline. The centerline was evaluated when the corrosion of the edges was taken into account.
Before the preparation of ASTM A 923, the corrosion test usually referred to the "improved ASTM G 48 test", but G48 was a laboratory research method rather than an acceptance method for material qualification. If the G 48 test is required, but it is not determined which G 48 operation method and other different test conditions are declared, then this requirement is incomplete. Test conditions include:
Surface preparation
Test temperature
Test duration
Does it include edge corrosion
Determination of eligibility criteria.
ASTM A 923 is an acceptance test, the purpose is to use an effective and relatively rapid method to prove that the products of the rolling mill are free of harmful intermetallic phases. ASTM A 923 Method C uses the corrosion rate as the acceptance criterion. It seems surprising to detect harmful phases by detecting pitting corrosion; however, this method is used for two reasons:
1. Check the pass or fail by weight loss, there is no need to judge whether there are pits on the metal surface, which is troublesome and may have a subjective color problem. The weight loss specified in the rejection is large enough to be easily measured, and in the 24-hour test, it is small enough to easily detect the type of pitting corrosion associated with the intermetallic phase.
2. If the corrosion rate is used, samples of almost any size and shape can be tested as long as the total surface area can be determined.
Compared to the Charpy test, which is susceptible to orientation and notch position, the corrosion test is conservative and insensitive to the geometry and position of the specimen. The corrosion test is appropriate as part of the welding procedure qualification and can be used as a cost-effective quality control test method for the inspection of productive weld samples, but it must be taken into account that the annealing products of the rolling mill and the welded joints are resistant The difference in corrosiveness, even for a properly welded weld, may have a critical pitting temperature 5 to 15°C lower than the parent metal due to the difference in welding process, shielding gas, and the grade of duplex stainless steel being welded.
6.2.6 Productive welding and inspection
The problems that may occur with duplex stainless steel are not obvious to the welder, nor can they be detected by non-destructive testing. Welders must recognize that the overall quality of the weld depends on whether the welding procedure is strictly followed and is measured by its toughness and corrosion resistance in use. Deviations from the specified process regulations may not be detected in the workshop, but each deviation is a threat to safe and economical use.
7 Mechanical properties
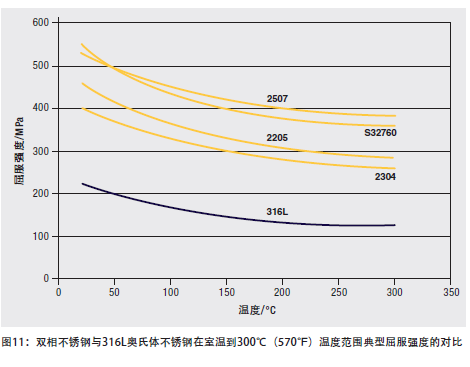
Duplex stainless steel has excellent mechanical properties, see Table 5. Their room temperature yield strength in solution annealed state is more than twice that of standard austenitic stainless steel without nitrogen addition, so that designers can reduce wall thickness in certain applications. Figure 11 compares the yield strength of several duplex stainless steels to 316L austenitic stainless steels from room temperature to 300°C (570°F). Due to the danger of the brittleness of the ferrite phase at 475°C (885°F), duplex stainless steels should not be used for a long period of time at temperatures above the conditions specified in the design regulations for pressure vessels (see Table 2).

The mechanical properties of forged and rolled duplex stainless steels are highly anisotropic, that is, the properties change with direction. This anisotropy is composed of elongated grains and crystal texture produced by hot or cold rolling (see Figure 2). Although the solidified structure of duplex stainless steel is usually isotropic, it is rolled or forged and then annealed, and there are two phases in the structure. The morphology of the two phases of the final product reveals the directionality of the processing. The strength of the duplex stainless steel perpendicular to the rolling direction is higher than that along the rolling direction. The impact toughness of the impact specimen perpendicular to the rolling direction is higher than that along the rolling direction. The "longitudinal" (L-T) Charpy impact test specimen has a higher toughness than the other test results. The impact energy of a transverse duplex stainless steel specimen is generally equivalent to 1/2 to 2/3 of a longitudinal specimen.
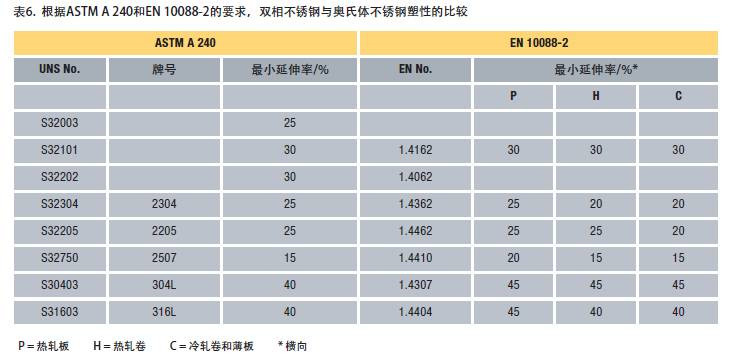
Although duplex stainless steels have high strength, they exhibit good plasticity and toughness. Compared with carbon steel or ferritic stainless steel, the plastic-brittle transition of duplex stainless steel is gentle. Duplex stainless steels maintain good toughness even at very low temperatures, such as -40°C/F; however, duplex stainless steels generally have lower toughness and plasticity than austenitic stainless steels. Austenitic stainless steels generally do not have a plastic-brittle transition, and maintain excellent toughness at low to cryogenic temperatures. The comparison between the minimum elongation of standard austenitic stainless steel and duplex stainless steel in tensile test is shown in Table 6.
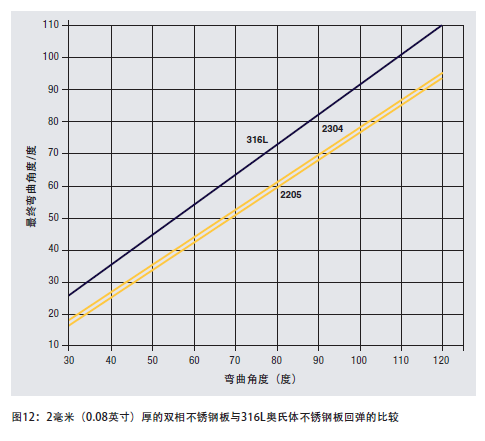
Although the high yield strength of duplex stainless steel allows the thickness to be reduced, it is also a problem in the manufacturing process due to the limitations of bending and Young's modulus. Due to their high strength, plastic deformation requires greater external force. Because duplex stainless steel requires a greater bending force, its springback during bending operations is greater than that of austenitic stainless steel. The rebound of two duplex stainless steels and 316L austenitic stainless steel is shown in Figure 12. Duplex stainless steels are less ductile than austenitic stainless steels, and bending radius needs to be increased to avoid fracture.
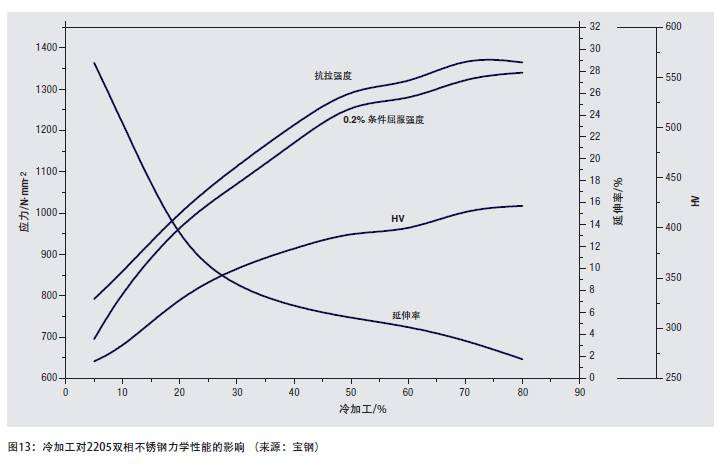
Due to the higher hardness and work hardening rate of duplex stainless steels, compared to standard austenitic stainless steels, it reduces the tool life in machining operations or requires more machining times. Annealing may be required between forming or bending operations, because the duplex stainless steel has almost half the plasticity of austenitic stainless steel. The effect of cold working on the mechanical properties of 2205 duplex stainless steel is shown in Figure 13.
8 Physical properties
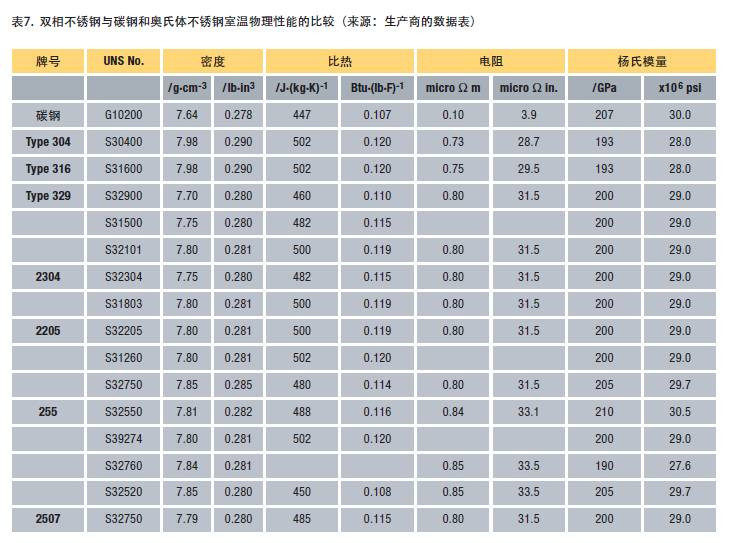
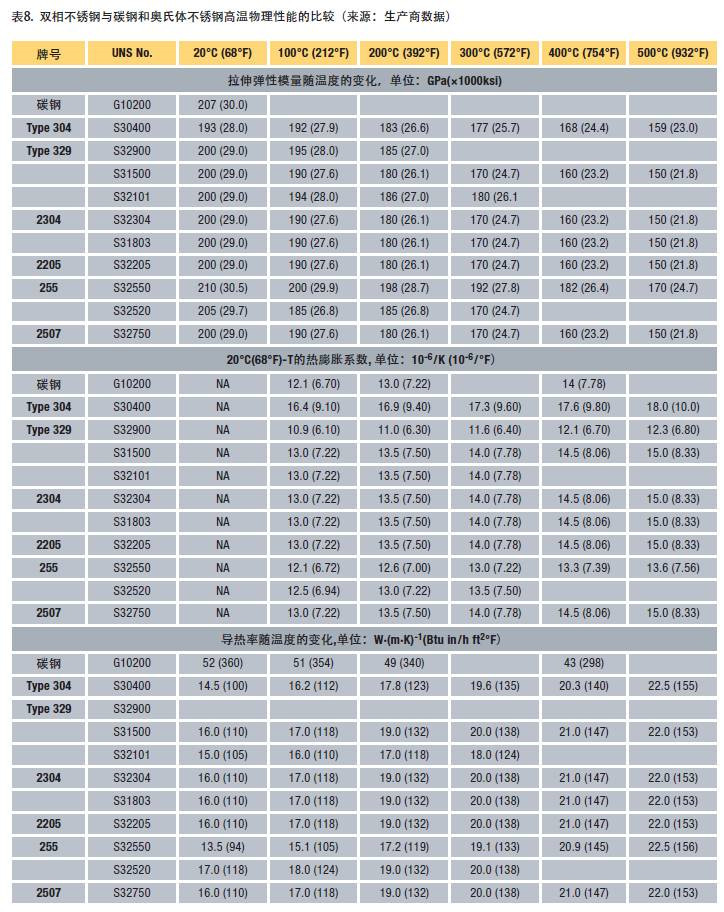
Table 7 shows the physical properties of a group of duplex stainless steels at room temperature. Table 8 shows the performance data at elevated temperatures. For comparison, carbon steel and austenitic stainless steel data are also included.
In all cases, the difference in physical properties between the duplex stainless steel grades is very small, and it may just be the difference in test methods. The physical properties of duplex stainless steel are between austenitic stainless steel and carbon steel, which is closer to the performance of stainless steel.
The application of duplex stainless steel is becoming more and more extensive, and users are more and more familiar with this type of stainless steel. This article focuses on one of the difficulties of duplex stainless steel application-processing and welding, introduces the various characteristics of duplex stainless steel, and gives the basic principles and practical information for processing and welding duplex stainless steel.
Contents include: history, chemical composition, metallurgy, corrosion resistance, mechanical properties, physical properties, technical conditions, quality control, cutting, forming, welding, and applications of duplex stainless steel.
The full text is longer and will be published in several parts. Welcome to pay attention!
(Continued from the previous article)
6 End user technical requirements and quality control
A key practical issue in the technical requirements and quality control of duplex stainless steel manufacturing and processing is the maintenance of performance after welding. The composition and process of the original supply of duplex stainless steel must ensure good performance after welding (using a qualified welding process).
6.1 Standard test requirements
6.1.1 Chemical composition
The ASTM or EN standard is a more appropriate starting point for selecting the second-generation duplex stainless steel. The addition of nitrogen to duplex stainless steel is advantageous, not only to avoid excessive ferrite in the heat affected zone, but also to make the material have better metallurgical stability. The upper limit of the nitrogen content of duplex stainless steel is the solubility of nitrogen in molten steel, which can be reflected from the maximum value of the nitrogen content range specified by the standard, but the minimum nitrogen content listed does not necessarily reflect the nitrogen content required for optimal welding characteristics. . For example, the original grade S31803 of 2205 duplex stainless steel.
When the nitrogen content of S31803 is in the lower limit of its allowable range of 0.08% to 0.20%, the effect of 2205 after heat treatment and welding is not ideal. Practical experience shows that for the welding process of 2205 duplex stainless steel, "the minimum nitrogen content is 0.14%" is necessary. Since this condition is often specified, the S32205 version of 2205 is introduced into the duplex stainless steel standard for the convenience of end users who need to weld. Super duplex stainless steel also has a higher nitrogen content range, which reflects people's understanding of the importance of nitrogen content.
The technical conditions of duplex stainless steel that some end users rely on are based on the "PREN" relationship. Although the PREN value may be effective in ranking the corrosion resistance of different grades with a balanced composition in a family, changing the composition to meet a specific PREN value may not necessarily achieve a proper metallurgical balance. The PREN value helps people choose one of a series of grades. When used to adjust the composition of a certain grade, it seems that chromium and molybdenum can be replaced by nitrogen, but from the perspective of metallurgy, chromium and molybdenum promote ferrite The bulk and intermetallic phases are formed, while nitrogen promotes the austenite phase and prevents the formation of intermetallic phases.
Therefore, it is best to select the composition of duplex stainless steel according to the standard grades listed in the specification. It is possible that each grade limits the upper limit of nitrogen content. Regardless of the composition of the material, it should be the same as the material used in the welding procedure qualification, so that the evaluation is meaningful for the expected results of processing and manufacturing.
6.1.2 Solution treatment and quenching
In addition to the chemical composition, the actual heat treatment conditions of the rolled material are also important for welding. The purpose of austenitic stainless steel annealing is to recrystallize the metal and dissolve the carbon into the solid solution. Low-carbon stainless steel with "L" can be relatively slow in water quenching or air cooling because it takes a long time to reform harmful carbides. However, for duplex stainless steels, even with an ideal nitrogen content, staying in the critical temperature range for a few minutes is also detrimental to its corrosion resistance and toughness. When the rolled material is cooled slowly, the time that the material passes through the temperature range of 700 to 980 °C (1300 to 1800 °F) no longer allows further heating such as welding, so it is left to the welder to weld the weld zone without the intermetallic phase of the heat affected zone. Less time.
Although standards such as ASTM allow certain duplex stainless steels to be "water quenched or rapidly cooled by other methods", the optimal metallurgical conditions for welding are obtained by quenching from the annealing temperature most quickly. However, this ignores the deformation and the increase in residual stress caused by water quenching. For thin plates, air cooling is highly efficient in modern coil production lines; but for thick plates, water quenching can obtain the best metallurgical conditions for welding. Cooling the sheet or component to 700-980°C (1300-1800°F) before quenching will result in the formation of intermetallic phases.
Another way to ensure optimal starting conditions is to require inspection of the products of the rolling mill to ensure that there are no harmful intermetallic phases. ASTM A 923 (Standard Test Method for Intermetallic Phase Detection in Duplex Austenitic/Ferritic Stainless Steel) Use metallographic examination, impact test or corrosion test to prove that intermetallic phase has not reached harmful levels.
This test only considers whether precipitation of harmful phases has occurred. The EN standard does not include similar test procedures. Using this test can prove that the rolling process ensures that no harmful intermetallic phases are formed during processing. This test is similar to ASTM A 262 (Standard Practice for Detecting Intergranular Corrosion Sensitivity of Austenitic Stainless Steels) or EN ISO 3651-2 (Determination of Intergranular Corrosion Resistance of Stainless Steels-Part 2: Ferrite, Austenitic and Ferrite-austenitic (duplex) stainless steel-corrosion test in sulfuric acid-containing medium) to check whether austenite stainless steel is sensitized by chromium carbide.
The ASTM A 923 standard covers only 2205 (S31803 and S32205), 2507, 255 and S32520, but other duplex stainless steels may also be included in the future. Many manufacturers use these and similar tests and other acceptance criteria as part of the welding procedure qualification.
6.2 Special test requirements
6.2.2 Tensile and hardness test
Compared with austenitic stainless steel, duplex stainless steel has high strength, but occasionally there are end user technical requirements that specify both the strength and the maximum hardness. The introduction of the maximum value of strength or hardness may be based on the experience of martensitic stainless steel. The high strength and hardness of martensitic stainless steel come from martensite that has not been tempered. However, the duplex stainless steel does not form martensite during cooling. The high strength and hardness of the duplex stainless steel are due to its high nitrogen content, the duplex structure itself, and the work hardening that may occur during forming or straightening operations.
The hardness test may be an effective means to prove that there is no excessive cold working in the process; but when the hardness test is used for this purpose, it is important that the measurement position should be between the surface and the center of the section, rather than when local hardening and Surface hardened on the surface.
6.2.2 Bending test
The bending test can prove that the products of the rolling mill have no rolling cracks, but it may be difficult for large-scale materials, small-rolled products or certain geometric shapes. The bending test is not a conservative indicator of the quality of duplex stainless steel, because the bending point may be inconsistent with the location of the unqualified situation. Due to the directionality of the bending, certain conditions such as the centerline intermetallic phase may not be detected.
The bending test is generally used as part of the austenitic stainless steel welding procedure evaluation, because the weld has the risk of thermal cracking, especially for the severely restricted weld structure with high austenite phase content.
Due to the presence of ferrite crystals and higher thermal conductivity and lower thermal expansion, duplex stainless steel greatly reduces the role of bending tests to detect weld integrity problems. If the test location coincides with the affected area, the bending test may roughly detect too much ferrite, but the bending test may not detect a small amount of metal that is harmful to the corrosion resistance and toughness of the finished product Phase of existence.
6.2.3 Impact test and metallographic inspection to detect intermetallic phase
There are two ways to specify materials and assessment processes using impact tests:
Test under known conditions to detect unqualified materials, such as the presence of excessive ferrite or intermetallic phases;
Prove that the characteristics of the processed products fully meet the expected use requirements.
For the first application, ASTM A 923 gives the test method for 2205 duplex steel. ASTM A 923 Method B describes the reduction in toughness. The standard longitudinal Charpy test (Charpy) at -40°F/°C impact test has a toughness of less than 54J (40ft-Ib) indicating that the annealed product of the rolling mill is unacceptable.
In order to ensure satisfactory heat treatment and quenching, as a means of production control, each batch of rolling mill products should be tested according to A 923 Method B (or Method C, corrosion test). ASTM A 923 allows the use of metallographic examination (Method A) as a screening test for acceptance rather than rejection. Because the operation of Method A requires a high level of metallographic techniques, it is prudent for users to request Method C corrosion tests instead of metallographic inspections. The method for proposing this is to report the corrosion rate.
One benefit of ASTM A 923 Method A is that the centerline intermetallic phase can be confirmed, as shown in Figure 7 of ASTM A 923. According to the screening method of Method A, the centerline intermetallic phase will cause the material to fail, but the result of the impact test of Method A 923 Method B is not necessarily that the material is rejected. Since this centerline intermetallic phase may lead to delamination of medium and heavy plates during forming, hot shearing, or welding, users should request inspection of method A in addition to method B or C, and reject any display of centerlines Material of intermetallic phase. Although ASTM A 923 has stated that Method A is not used for the rejection of materials, it allows end users to impose stricter requirements. If the material exhibits the centerline intermetallic phase near the middle of the thickness shown in Figure 7 of ASTM A 923, it should be rejected.
The second use of the impact test is to evaluate the base metal (base metal), fusion zone and heat affected zone under more severe conditions than expected, which may be a cautious and cost-effective method. For the evaluation of welds, the test temperature and qualification criteria must be specific to the type of welding and related to the conditions of use. The toughness will not be as high as the solution-annealed duplex stainless steel rolled product. The lower toughness of the weld metal does not necessarily indicate the presence of intermetallic phases, but is often caused by the increased oxygen content, especially the use of flux protection welding processes.
ASME has issued new technical requirements for duplex stainless steels with a cross-section thickness greater than 9.5 mm. These requirements require the Charpy impact test at or below the metal minimum design temperature (MDMT), and the initial expansion is used to prove the initial The toughness of the base metal and product welds is sufficient to meet future use requirements. The difference between the ASME test and the ASTM A 923 test is that the ASME test requires that the Charpy impact test include three specimens (the more commonly used method for measuring the toughness is applicable), and requires the reporting of minimum and average values. ASME requires that each batch of parent metal and filler material be tested for parent metal, weld metal and HAZ.
In order to save and obtain cautious results at the same time, the lower one of the two test temperatures (ASTM A 923-40°C/F or the minimum metal design temperature MDMT in the ASME standard) can be used by measuring the impact energy of three samples And side expansion to measure its toughness.
6.2.4 Metal phase or magnetic method to determine phase equilibrium
The austenite-ferrite phase balance of duplex stainless steel rolled products varies little between furnace number and furnace number or batch number and batch number, because the chemical composition in production is controlled in a narrow range, and The annealing operation is clearly defined. Generally, 2205 dual-phase steel contains 40% to 50% ferrite, so the value of the phase balance of the annealed rolled material is limited.
However, the determination of the ferrite content is suitable for evaluating the welding process, which can prevent excessive ferrite in the heat affected zone. Accurate determination of the phase balance of duplex stainless steel usually requires the use of metallographic examination and the number point method, such as ASTM E 562 (manual) or E 1245 (automatic) method. Because duplex stainless steel is ferromagnetic, the distance between austenite and ferrite is extremely fine. If there is no metallographic measurement result with the same geometry and phase balance as a reference standard, the reliability of the magnetic detection method is limited. AWS A4.2-91 and EN ISO 8249 (Welding-Determining the number of ferrite (FN) in austenitic and duplex ferrite austenitic Cr-Ni stainless steel welding materials) describes the process of calibrating the magnetic measuring instrument , Measure the ferrite at the duplex stainless steel weld and report the result as the number of ferrite FN. The range of qualified weld phase balance is much wider than the parent metal. If the toughness and corrosion resistance of the weld and heat affected zone are acceptable as shown in the ASTM A 923 test, then the ferrite range of 25% to 75% can provide the required characteristics of duplex stainless steel. Magnetic measurement shows that the ferrite number is between 30 and 90.
Requires the determination of the phase balance of materials that have been placed in the processing service center or dealer warehouse. It will cost more than the same requirements for the materials just produced from the rolling mill, obtain samples and conduct separate tests It may also affect timely delivery.
Because the intermetallic phase is non-magnetic, the magnetic test cannot be used to detect the s and c phases.
6.2.5 Corrosion test
Corrosion testing of solution-treated rolled products in accordance with ASTM A 923 Method C is one of the most cost-effective methods for detecting hazardous conditions. The precipitation of intermetallic phases and the possible presence of chromium nitride in the ferrite phase can be detected as a decrease in pitting corrosion resistance.
These phases cause the critical pitting temperature (CPT) to be 15°C or more lower than that of normally annealed materials. Determining the actual critical pitting temperature of the sample is expensive because it requires multiple tests on a single sample in accordance with ASTM G 48 or ASTM G 150. However, a single corrosion test (ASTM A923 Method C) at a temperature 10 to 15°C lower than the usual critical temperature of duplex stainless steels will reveal the presence of harmful phases. When a corrosion test is used to detect the presence of harmful phases, any pitting on the front or sides and edges should be used as the basis for rejection. Although the edges may not contact the medium in actual equipment, the purpose of the test is to detect intermetallic phases, and they are more likely to appear on the centerline. The centerline was evaluated when the corrosion of the edges was taken into account.
Before the preparation of ASTM A 923, the corrosion test usually referred to the "improved ASTM G 48 test", but G48 was a laboratory research method rather than an acceptance method for material qualification. If the G 48 test is required, but it is not determined which G 48 operation method and other different test conditions are declared, then this requirement is incomplete. Test conditions include:
Surface preparation
Test temperature
Test duration
Does it include edge corrosion
Determination of eligibility criteria.
ASTM A 923 is an acceptance test, the purpose is to use an effective and relatively rapid method to prove that the products of the rolling mill are free of harmful intermetallic phases. ASTM A 923 Method C uses the corrosion rate as the acceptance criterion. It seems surprising to detect harmful phases by detecting pitting corrosion; however, this method is used for two reasons:
1. Check the pass or fail by weight loss, there is no need to judge whether there are pits on the metal surface, which is troublesome and may have a subjective color problem. The weight loss specified in the rejection is large enough to be easily measured, and in the 24-hour test, it is small enough to easily detect the type of pitting corrosion associated with the intermetallic phase.
2. If the corrosion rate is used, samples of almost any size and shape can be tested as long as the total surface area can be determined.
Compared to the Charpy test, which is susceptible to orientation and notch position, the corrosion test is conservative and insensitive to the geometry and position of the specimen. The corrosion test is appropriate as part of the welding procedure qualification and can be used as a cost-effective quality control test method for the inspection of productive weld samples, but it must be taken into account that the annealing products of the rolling mill and the welded joints are resistant The difference in corrosiveness, even for a properly welded weld, may have a critical pitting temperature 5 to 15°C lower than the parent metal due to the difference in welding process, shielding gas, and the grade of duplex stainless steel being welded.
6.2.6 Productive welding and inspection
The problems that may occur with duplex stainless steel are not obvious to the welder, nor can they be detected by non-destructive testing. Welders must recognize that the overall quality of the weld depends on whether the welding procedure is strictly followed and is measured by its toughness and corrosion resistance in use. Deviations from the specified process regulations may not be detected in the workshop, but each deviation is a threat to safe and economical use.
7 Mechanical properties
Duplex stainless steel has excellent mechanical properties, see Table 5. Their room temperature yield strength in solution annealed state is more than twice that of standard austenitic stainless steel without nitrogen addition, so that designers can reduce wall thickness in certain applications. Figure 11 compares the yield strength of several duplex stainless steels to 316L austenitic stainless steels from room temperature to 300°C (570°F). Due to the danger of the brittleness of the ferrite phase at 475°C (885°F), duplex stainless steels should not be used for a long period of time at temperatures above the conditions specified in the design regulations for pressure vessels (see Table 2).


The mechanical properties of forged and rolled duplex stainless steels are highly anisotropic, that is, the properties change with direction. This anisotropy is composed of elongated grains and crystal texture produced by hot or cold rolling (see Figure 2). Although the solidified structure of duplex stainless steel is usually isotropic, it is rolled or forged and then annealed, and there are two phases in the structure. The morphology of the two phases of the final product reveals the directionality of the processing. The strength of the duplex stainless steel perpendicular to the rolling direction is higher than that along the rolling direction. The impact toughness of the impact specimen perpendicular to the rolling direction is higher than that along the rolling direction. The "longitudinal" (L-T) Charpy impact test specimen has a higher toughness than the other test results. The impact energy of a transverse duplex stainless steel specimen is generally equivalent to 1/2 to 2/3 of a longitudinal specimen.
Although duplex stainless steels have high strength, they exhibit good plasticity and toughness. Compared with carbon steel or ferritic stainless steel, the plastic-brittle transition of duplex stainless steel is gentle. Duplex stainless steels maintain good toughness even at very low temperatures, such as -40°C/F; however, duplex stainless steels generally have lower toughness and plasticity than austenitic stainless steels. Austenitic stainless steels generally do not have a plastic-brittle transition, and maintain excellent toughness at low to cryogenic temperatures. The comparison between the minimum elongation of standard austenitic stainless steel and duplex stainless steel in tensile test is shown in Table 6.

Although the high yield strength of duplex stainless steel allows the thickness to be reduced, it is also a problem in the manufacturing process due to the limitations of bending and Young's modulus. Due to their high strength, plastic deformation requires greater external force. Because duplex stainless steel requires a greater bending force, its springback during bending operations is greater than that of austenitic stainless steel. The rebound of two duplex stainless steels and 316L austenitic stainless steel is shown in Figure 12. Duplex stainless steels are less ductile than austenitic stainless steels, and bending radius needs to be increased to avoid fracture.

Due to the higher hardness and work hardening rate of duplex stainless steels, compared to standard austenitic stainless steels, it reduces the tool life in machining operations or requires more machining times. Annealing may be required between forming or bending operations, because the duplex stainless steel has almost half the plasticity of austenitic stainless steel. The effect of cold working on the mechanical properties of 2205 duplex stainless steel is shown in Figure 13.

8 Physical properties
Table 7 shows the physical properties of a group of duplex stainless steels at room temperature. Table 8 shows the performance data at elevated temperatures. For comparison, carbon steel and austenitic stainless steel data are also included.
In all cases, the difference in physical properties between the duplex stainless steel grades is very small, and it may just be the difference in test methods. The physical properties of duplex stainless steel are between austenitic stainless steel and carbon steel, which is closer to the performance of stainless steel.


(To be continued)

