ASTM A312 Austenitic Stainless Steel Pipes
ASTM A312/A312M
Standard Specification for Seamless, Welded, and Heavily Cold Worked Austenitic Stainless Steel Pipes
1. Scope*
1.1 This specification covers seamless, straight-seam welded, and heavily cold worked welded austenitic stainless steel pipe intended for high-temperature and general corrosiveservice.
N OTE 1—When the impact test criterion for a low-temperature service would be 15 ft·lbf [20 J] energy absorption or 15 mils [0.38 mm] lateral expansion, some of the austenitic stainless steel grades covered by this specification are accepted by certain pressure vessel or piping codes without the necessity of making the actual test. For example, Grades TP304, TP304L, and TP347 are accepted by the ASME Pressure Vessel Code, Section VIII Division 1, and by the Chemical Plant and Refinery Piping Code, ANSI B31.3, for service at temperatures as low as −425 °F [−250 °C] without qualification by impact tests. Other AISI stainless steel grades are usually accepted for service temperatures as low as −325 °F [−200 °C] without impact testing. Impact testing may, under certain circumstances, be required. For example, materials with chromium or nickel content outside the AISI ranges, and for material with carbon content exceeding 0.10 %, are required to be impact tested under the rules of ASME Section VIII Division 1 when service temperatures are lower than −50 °F [−45 °C].
1.2 Grades TP304H, TP309H, TP309HCb, TP310H,TP310HCb, TP316H, TP321H, TP347H, and TP348H are modifications of Grades TP304, TP309Cb, TP309S, TP310Cb,TP310S, TP316, TP321, TP347, and TP348, and are intended for service at temperatures where creep and stress rupture properties are important.
1.3 Optional supplementary requirements are provided for pipe where a greater degree of testing is desired. These supplementary requirements call for additional tests to be made and, when desired, it is permitted to specify in the order one or more of these supplementary requirements.
1.4 Table X1.1 lists the standardized dimensions of welded and seamless stainless steel pipe as shown in ANSI B36.19.These dimensions are also applicable to heavily cold worked pipe. Pipe having other dimensions is permitted to be ordered and furnished provided such pipe complies with all other requirements of this specification.
1.5 Grades TP321 and TP321H have lower strength requirements for pipe manufactured by the seamless process in nominal wall thicknesses greater than 3 ⁄ 8 in. [9.5 mm].
1.6 The values stated in either SI units or inch-pound units are to be regarded separately as standard. Within the text, the SI units are shown in brackets. The values stated in each system may not be exact equivalents; therefore, each system
shall be used independently of the other. Combining values from the two systems may result in non-conformance with the standard. The inch-pound units shall apply unless the “M”designation of this specification is specified in the order.
NOTE 2—The dimensionless designator NPS (nominal pipe size) has been substituted in this standard for such traditional terms as “nominal diameter,” “size,” and “nominal size.”
2. Referenced Documents
2.1 ASTM Standards:
A262 Practices for Detecting Susceptibility to Intergranular Attack in Austenitic Stainless Steels
A370 Test Methods and Definitions for Mechanical Testing of Steel Products
A941 Terminology Relating to Steel, Stainless Steel, Related Alloys, and Ferroalloys
A999/A999M Specification for General Requirements for Alloy and Stainless Steel Pipe
A1016/A1016M Specification for General Requirements for Ferritic Alloy Steel, Austenitic Alloy Steel, and Stainless Steel Tubes
E112 Test Methods for Determining Average Grain Size
E381 Method of Macroetch Testing Steel Bars, Billets,Blooms, and Forgings
E527 Practice for Numbering Metals and Alloys in the Unified Numbering System (UNS)
2.2 ANSI Standards:
B1.20.1 Pipe Threads, General Purpose
B36.10 Welded and Seamless Wrought Steel Pipe
B36.19 Stainless Steel Pipe
2.3 ASME Standard:
ASME Boiler and Pressure Vessel Code : Section VIII
2.4 AWS Standard:
A5.9 Corrosion-Resisting Chromium and Chromium-Nickel Steel Welding Rods and Electrodes
2.5 Other Standard:
SAE J1086 Practice for Numbering Metals and Alloys (UNS) 7
3. Terminology
3.1 Definitions:
3.1.1 The definitions in Specification A999/A999M and Terminology A941 are applicable to this specification.
4. Ordering Information
4.1 Orders for material to this specification shall conform to the requirements of the current edition of Specification A999/A999M.
5. General Requirements
5.1 Material furnished under this specification shall conform to the applicable requirements of the current edition of Specification A999/A999M unless otherwise provided herein.
6. Materials and Manufacture
6.1 Manufacture:
6.1.1 The pipe shall be manufactured by one of the following processes:
6.1.2 Seamless (SML) pipe shall be made by a process that does not involve welding at any stage of production.
6.1.3 Welded (WLD) pipe shall be made using an automatic welding process with no addition of filler metal during the welding process.
6.1.4 Heavily cold-worked (HCW) pipe shall be made by applying cold working of not less than 35 % reduction in thickness of both wall and weld to a welded pipe prior to the final anneal. No filler shall be used in making the weld. Prior to cold working, the weld shall be 100 % radiographically inspected in accordance with the requirements ofASME Boiler and Pressure Vessel Code, Section VIII, Division 1, latest revision, Paragraph UW-51.
6.1.5 Welded pipe and HCW pipe of NPS 14 and smaller shall have a single longitudinal weld. Welded pipe and HCW pipe of a size larger than NPS 14 shall have a single longitudinal weld or shall be produced by forming and welding two longitudinal sections of flat stock when approved by the purchaser. All weld tests, examinations, inspections, or treatments shall be performed on each weld seam.
6.1.6 At the option of the manufacturer, pipe shall be either hot finished or cold finished.
6.1.7 The pipe shall be free of scale and contaminating exogenous iron particles. Pickling, blasting, or surface finishing is not mandatory when pipe is bright annealed. The purchaser is permitted to require that a passivating treatment be applied to the finished pipe.
6.2 Heat Treatment—All pipe shall be furnished in the heat-treated condition in accordance with the requirements of Table 2. Alternatively, for seamless pipe, immediately following hot forming while the temperature of the pipes is not less than the minimum solution treatment temperature specified in Table 2, pipes shall be individually quenched in water or rapidly cooled by other means (direct quenched).
A New designation established in accordance with Practice E527 and SAE J1086.
B Minimum, unless otherwise stated.
C Quenched in water or rapidly cooled by other means, at a rate sufficient to prevent re-precipitation of carbides, as demonstrable by the capability of pipes,heat treated by either separate solution annealing or by direct quenching, of passing Practices A262, Practice E. The manufacturer is not required to run the test unless it is specified on the purchase order (see Supplementary Requirement S7). Note that Practices A262 requires the test to be performed on sensitized specimens in the low-carbon and stabilized types and on specimens representative of the as-shipped condition for other types. In the case of low-carbon types containing 3 % or more molybdenum, the applicability of the sensitizing treatment prior to testing shall be a matter for negotiation between the seller and the purchaser.
D Quenched in water or rapidly cooled by other means.
7. Chemical Composition
7.1 The steel shall conform to the requirements as to chemical composition prescribed in Table 1.
8. Product Analysis
8.1 At the request of the purchaser, an analysis of one billet or one length of flat-rolled stock from each heat, or two pipes from each lot shall be made by the manufacturer. A lot of pipe shall consist of the following number of lengths of the same size and wall thickness from any one heat of steel:
8.2 The results of these analyses shall be reported to the purchaser or the purchaser’s representative, and shall conform to the requirements specified in Section 7.
8.3 If the analysis of one of the tests specified in 8.1 does not conform to the requirements specified in Section 7, an analysis of each billet or pipe from the same heat or lot may be made, and all billets or pipe conforming to the requirements shall be accepted.
9. Permitted Variations in Wall Thickness
9.1 In addition to the implicit limitation of wall thickness for seamless pipe imposed by the limitation on weight in Specification A999/A999M, the wall thickness for seamless and welded pipe at any point shall be within the tolerances specified in Table 3, except that for welded pipe the weld area shall not be limited by the “Over” tolerance. The wall thickness and outside diameter for inspection for compliance with this requirement for pipe ordered by NPS and schedule number is shown in Table X1.1.
where:
t = Nominal Wall Thickness
D = Ordered Outside Diameter
10. Tensile Requirements
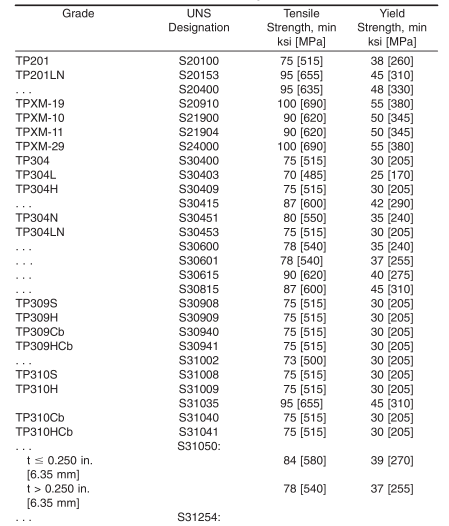
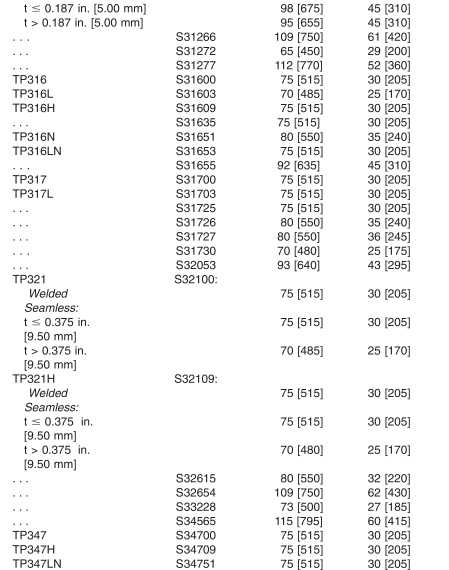
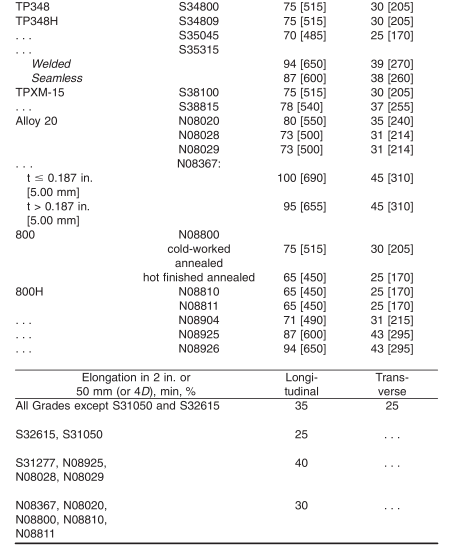
10.1 The tensile properties of the material shall conform to the requirements prescribed in Table 4.
11. Mechanical Tests, Grain Size Determinations, and Weld Decay Tests Required
11.1 Mechanical Testing Lot Definition—The term lot for mechanical tests shall be as follows:
11.1.1 Where the final heat treated condition is obtained,consistent with the requirements of 6.2, in a continuous furnace, by quenching after hot forming or in a batch-type furnace equipped with recording pyrometers and automatically controlled within a 50 °F [30 °C] or lesser range, the term lot for mechanical tests shall apply to all pipes of the same specified outside diameter and specified wall thickness (or schedule) that are produced from the same heat of steel and subjected to the same finishing treatment within the same operating period.
11.1.2 Where the final heat treated condition is obtained,consistent with the requirements of6.2, in a batch-type furnace not equipped with recording pyrometers and automatically controlled within a 50 °F [30 °C] or lesser range, the term lot shall apply to the larger of: (a) each 200 ft [60 m] or fraction thereof and (b) those pipes heat treated in the same furnace batch charge for pipes of the same specified outside diameter and specified wall thickness (or schedule) that are produced from the same heat of steel and are subjected to the same finishing temperature within the same operating period.
11.2 Transverse or Longitudinal Tension Test—One tension test shall be made on a specimen for lots of not more than 100 pipes. Tension tests shall be made on specimens from two tubes for lots of more than 100 pipes.
11.3 Flattening Test—For material heat treated in a continuous furnace, by quenching after hot forming or in a batch-type furnace equipped with recording pyrometers and automatically controlled within a 50 °F [30 °C] or lesser range, flattening tests shall be made on a sufficient number of pipe to constitute 5 % of the lot, but in no case less than 2 lengths of pipe. For material heat treated in a batch-type furnace not equipped with recording pyrometers and automatically controlled within a 50 °F [30 °C] or lesser range, flattening tests shall be made on 5 % of the pipe from each heat treated lot.
11.3.1 For welded pipe a transverse-guided face bend test of the weld may be conducted instead of a flattening test in accordance with the method outlined in the steel tubular product supplement ofTest Methods and Definitions A370. For welded pipe with a specified wall thickness over 3 ⁄ 8 in., twoside bend tests may be made instead of the face bend test. The ductility of the weld shall be considered acceptable when there is no evidence of cracks in the weld or between the weld and the base metal after bending. Test specimens from 5 % of the lot shall be taken from the pipe or test plates of the same material as the pipe, the test plates being attached to the end of the cylinder and welded as a prolongation of the pipe longitudinal seam.
11.4 Grain Size—Grain size determinations, in accordance with Test Methods E112, shall be made on the grades listed in Table 5. Grain size determinations shall be made on each heat treatment lot, as defined in 11.1, for the same number of pipes as prescribed for the flattening test in 11.3. The grain size results shall conform to the requirements prescribed in Table 5.
11.5 HCW pipe shall be capable of passing the weld decay tests listed in Supplementary S9 with a weld metal to base metal loss ratio of 0.90 to 1.1. The test is not required to be performed unless S9 is specified in the purchase order.
12. Hydrostatic or Nondestructive Electric Test
12.1 Each pipe shall be subjected to the nondestructive electric test or the hydrostatic test. The type of test to be used shall be at the option of the manufacturer, unless otherwise specified in the purchase order.
12.2 The hydrostatic test shall be in accordance with Specification A999/A999M, unless specifically exempted under the provisions of 12.3.
12.3 For pipe whose dimensions equal or exceed NPS10, the purchaser, with the agreement of the manufacturer, is permitted to waive the hydrostatic test requirement when in lieu of such test the purchaser performs a system test. Each length of pipe furnished without the completed manufacturer’s hydrostatic test shall include with the mandatory markings the letters “NH.”
12.4 The nondestructive electric test shall be in accordance with Specification A999/A999M.
13. Lengths
13.1 Pipe lengths shall be in accordance with the following regular practice:
13.1.1 Unless otherwise agreed upon, all sizes from NPS 1 ⁄ 8 to and including NPS 8 are available in a length up to 24 ft with the permitted range of 15 to 24 ft. Short lengths are acceptable and the number and minimum length shall be agreed upon between the manufacturer and the purchaser.
13.1.2 If definite cut lengths are desired, the lengths required shall be specified in the order. No pipe shall be under the specified length and no pipe shall be more than 1 ⁄ 4 in. [6 mm] over the specified length.
13.1.3 No jointers are permitted unless otherwise specified.
14. Workmanship, Finish, and Appearance
14.1 The finished pipes shall be reasonably straight and shall have a workmanlike finish. Removal of imperfections by grinding is permitted, provided the wall thicknesses are not decreased to less than that permitted in the Permissible Variations in Wall Thickness section of Specification A999/A999M.
15. Repair by Welding
15.1 For welded pipe whose diameter equals or exceeds NPS 6, and whose nominal wall thickness equals or exceeds 0.200, it is permitted to make weld repairs to the weld seam with the addition of compatible filler metal using the same procedures specified for plate defects in the section on Repair by Welding of Specification A999/A999M.
15.2 Weld repairs ofthe weld seam shall not exceed 20 % of the seam length.
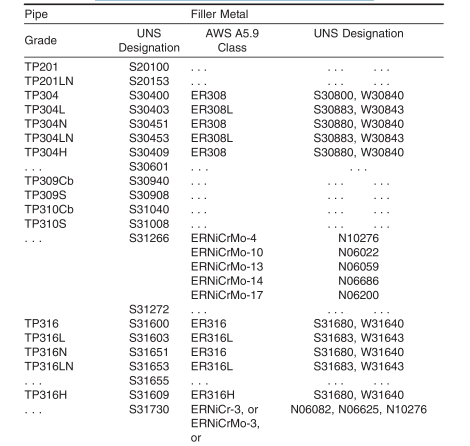
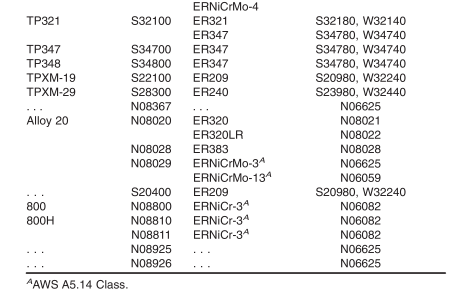
15.3 Weld repairs shall be made only with the gas tungstenarc welding process using the same classification of bare filler rod qualified to the most currentAWS SpecificationA5.9 as the grade of stainless steel pipe being repaired and as shown in Table 6. Alternatively, subject to approval by the purchaser, weld repairs shall be made only with the gas tungsten-arc welding process using a filler metal more highly alloyed than the base metal when needed for corrosion resistance or other properties.
15.4 Pipes that have had weld seam repairs with filler metal shall be uniquely identified and shall be so stated and identified on the certificate of tests. When filler metal other than that listed in Table 6 is used, the filler metal shall be identified on the certificate of tests.
16. Certification
16.1 In addition to the information required by Specification A999/A999M, the certification shall state whether or not the material was hydrostatically tested. If the material was nondestructively tested, the certification shall so state and shall state which standard practice was followed and what reference discontinuities were used.
17. Marking
17.1 In addition to the marking specified in Specification A999/A999M, the marking shall include the NPS (nominal pipe size) or outside diameter and schedule number or average wall thickness, heat number, and NH when hydrotesting is not performed and ET when eddy-current testing is performed or UT when ultrasonic testing is performed. The marking shall also include the manufacturer’s private identifying mark, the marking requirement of 12.3, if applicable, and whether seamless (SML), welded (WLD), or heavily cold-worked (HCW). For Grades TP304H, TP316H, TP321H, TP347H,TP348H, and S30815, the marking shall also include the heat number and heat-treatment lot identification. If specified in the purchase order, the marking for pipe larger than NPS 4 shall include the weight.
18. Government Procurement
18.1 Scale Free Pipe for Government Procurement:
18.1.1 When specified in the contract or order, the following requirements shall be considered in the inquiry, contract or order, for agencies of the U.S. Government where scale free pipe or tube is required. These requirements shall take precedence if there is a conflict between these requirements and the product specifications.
18.1.2 The requirements of Specification A999/A999M for pipe and Specification A1016/A1016M for tubes shall be applicable when pipe or tube is ordered to this specification.
18.1.3 Pipe and tube shall be one of the following grades as specified herein:
18.1.4 Part Number:
Example: ASTM A312/A312M Pipe 304 NPS 12 SCH 40S SMLS
18.1.4.1
18.1.5 Ordering Information—Orders for material under this specification shall include the following in addition to the requirements of Section 4:
18.1.5.1 Pipe or tube,
18.1.5.2 Part number,
18.1.5.3 Ultrasonic inspection, if required,
18.1.5.4 If shear wave test is to be conducted in two opposite circumferential directions,
18.1.5.5 Intergranular corrosion test, and
18.1.5.6 Level of preservation and packing required.
19. Keywords
19.1 austenitic stainless steel; seamless steel pipe; stainless steel pipe; steel pipe; welded steel pipe
Standard Specification for Seamless, Welded, and Heavily Cold Worked Austenitic Stainless Steel Pipes
1. Scope*
1.1 This specification covers seamless, straight-seam welded, and heavily cold worked welded austenitic stainless steel pipe intended for high-temperature and general corrosiveservice.
N OTE 1—When the impact test criterion for a low-temperature service would be 15 ft·lbf [20 J] energy absorption or 15 mils [0.38 mm] lateral expansion, some of the austenitic stainless steel grades covered by this specification are accepted by certain pressure vessel or piping codes without the necessity of making the actual test. For example, Grades TP304, TP304L, and TP347 are accepted by the ASME Pressure Vessel Code, Section VIII Division 1, and by the Chemical Plant and Refinery Piping Code, ANSI B31.3, for service at temperatures as low as −425 °F [−250 °C] without qualification by impact tests. Other AISI stainless steel grades are usually accepted for service temperatures as low as −325 °F [−200 °C] without impact testing. Impact testing may, under certain circumstances, be required. For example, materials with chromium or nickel content outside the AISI ranges, and for material with carbon content exceeding 0.10 %, are required to be impact tested under the rules of ASME Section VIII Division 1 when service temperatures are lower than −50 °F [−45 °C].
1.2 Grades TP304H, TP309H, TP309HCb, TP310H,TP310HCb, TP316H, TP321H, TP347H, and TP348H are modifications of Grades TP304, TP309Cb, TP309S, TP310Cb,TP310S, TP316, TP321, TP347, and TP348, and are intended for service at temperatures where creep and stress rupture properties are important.
1.3 Optional supplementary requirements are provided for pipe where a greater degree of testing is desired. These supplementary requirements call for additional tests to be made and, when desired, it is permitted to specify in the order one or more of these supplementary requirements.
1.4 Table X1.1 lists the standardized dimensions of welded and seamless stainless steel pipe as shown in ANSI B36.19.These dimensions are also applicable to heavily cold worked pipe. Pipe having other dimensions is permitted to be ordered and furnished provided such pipe complies with all other requirements of this specification.
1.5 Grades TP321 and TP321H have lower strength requirements for pipe manufactured by the seamless process in nominal wall thicknesses greater than 3 ⁄ 8 in. [9.5 mm].
1.6 The values stated in either SI units or inch-pound units are to be regarded separately as standard. Within the text, the SI units are shown in brackets. The values stated in each system may not be exact equivalents; therefore, each system
shall be used independently of the other. Combining values from the two systems may result in non-conformance with the standard. The inch-pound units shall apply unless the “M”designation of this specification is specified in the order.
NOTE 2—The dimensionless designator NPS (nominal pipe size) has been substituted in this standard for such traditional terms as “nominal diameter,” “size,” and “nominal size.”
2. Referenced Documents
2.1 ASTM Standards:
A262 Practices for Detecting Susceptibility to Intergranular Attack in Austenitic Stainless Steels
A370 Test Methods and Definitions for Mechanical Testing of Steel Products
A941 Terminology Relating to Steel, Stainless Steel, Related Alloys, and Ferroalloys
A999/A999M Specification for General Requirements for Alloy and Stainless Steel Pipe
A1016/A1016M Specification for General Requirements for Ferritic Alloy Steel, Austenitic Alloy Steel, and Stainless Steel Tubes
E112 Test Methods for Determining Average Grain Size
E381 Method of Macroetch Testing Steel Bars, Billets,Blooms, and Forgings
E527 Practice for Numbering Metals and Alloys in the Unified Numbering System (UNS)
2.2 ANSI Standards:
B1.20.1 Pipe Threads, General Purpose
B36.10 Welded and Seamless Wrought Steel Pipe
B36.19 Stainless Steel Pipe
2.3 ASME Standard:
ASME Boiler and Pressure Vessel Code : Section VIII
2.4 AWS Standard:
A5.9 Corrosion-Resisting Chromium and Chromium-Nickel Steel Welding Rods and Electrodes
2.5 Other Standard:
SAE J1086 Practice for Numbering Metals and Alloys (UNS) 7
3. Terminology
3.1 Definitions:
3.1.1 The definitions in Specification A999/A999M and Terminology A941 are applicable to this specification.
4. Ordering Information
4.1 Orders for material to this specification shall conform to the requirements of the current edition of Specification A999/A999M.
5. General Requirements
5.1 Material furnished under this specification shall conform to the applicable requirements of the current edition of Specification A999/A999M unless otherwise provided herein.
6. Materials and Manufacture
6.1 Manufacture:
6.1.1 The pipe shall be manufactured by one of the following processes:
6.1.2 Seamless (SML) pipe shall be made by a process that does not involve welding at any stage of production.
6.1.3 Welded (WLD) pipe shall be made using an automatic welding process with no addition of filler metal during the welding process.
6.1.4 Heavily cold-worked (HCW) pipe shall be made by applying cold working of not less than 35 % reduction in thickness of both wall and weld to a welded pipe prior to the final anneal. No filler shall be used in making the weld. Prior to cold working, the weld shall be 100 % radiographically inspected in accordance with the requirements ofASME Boiler and Pressure Vessel Code, Section VIII, Division 1, latest revision, Paragraph UW-51.
6.1.5 Welded pipe and HCW pipe of NPS 14 and smaller shall have a single longitudinal weld. Welded pipe and HCW pipe of a size larger than NPS 14 shall have a single longitudinal weld or shall be produced by forming and welding two longitudinal sections of flat stock when approved by the purchaser. All weld tests, examinations, inspections, or treatments shall be performed on each weld seam.
6.1.6 At the option of the manufacturer, pipe shall be either hot finished or cold finished.
6.1.7 The pipe shall be free of scale and contaminating exogenous iron particles. Pickling, blasting, or surface finishing is not mandatory when pipe is bright annealed. The purchaser is permitted to require that a passivating treatment be applied to the finished pipe.
6.2 Heat Treatment—All pipe shall be furnished in the heat-treated condition in accordance with the requirements of Table 2. Alternatively, for seamless pipe, immediately following hot forming while the temperature of the pipes is not less than the minimum solution treatment temperature specified in Table 2, pipes shall be individually quenched in water or rapidly cooled by other means (direct quenched).
TABLE 2 Annealing Requirements
| Grade or UNS Designation A |
Heat Treating Temperature B |
Cooling/Testing Requirements |
| All grades not individually listed below: | 1900 °F [1040 °C] | C |
| TP321H, TP347H, TP348H | ||
| Cold finished | 2000 °F [1100 °C] | D |
| Hot finished | 1925 °F [1050 °C] | D |
| TP304H, TP316H | ||
| Cold finished | 1900 °F [1040 °C] | D |
| Hot finished | 1900 °F [1040 °C] | DD |
| TP309H, TP309HCb, TP310H,TP310HCb | 1900 °F [1040 °C] | |
| S30600 |
2010–2140 °F [1100–1170 °C] |
D |
| S30601 |
2010–2140 °F [1100–1170 °C] |
D |
| S30815, S31272 | 1920 °F [1050 °C] | D |
| S31035 |
2160–2280 °F [1180–1250 °C] |
D |
| S31254, S32654 | 2100 °F [1150 °C] | D |
| S31266 | 2100 °F [1150 °C] | D |
| S31277 | 2050 °F [1120 °C] | D |
| S31727, S32053 |
1975–2155 °F [1080–1180 °C] |
D |
| S33228 |
2050–2160 °F [1120–1180 °C] |
D |
| S34565 |
2050–2140 °F [1120–1170 °C] |
D |
| S35315 | 2010 °F [1100 °C] | D |
| S38815 | 1950 °F [1065 °C] | D |
| N08367 | 2025 °F [1110 °C] | D |
| N08020 |
1700–1850 °F [925–1010 °C] |
D |
| N08028 | 2000 °F [1100 °C] | D |
| N08029 | 2000 °F [1100 °C] | D |
| N08810 | 2050 °F [1120 °C] | D |
| N08811 | 2100 °F [1150 °C] | D |
| N08904 | 2000 °F [1100 °C] | D |
| N08925, N08926 |
2010–2100 °F [1100–1150 °C] |
D |
A New designation established in accordance with Practice E527 and SAE J1086.
B Minimum, unless otherwise stated.
C Quenched in water or rapidly cooled by other means, at a rate sufficient to prevent re-precipitation of carbides, as demonstrable by the capability of pipes,heat treated by either separate solution annealing or by direct quenching, of passing Practices A262, Practice E. The manufacturer is not required to run the test unless it is specified on the purchase order (see Supplementary Requirement S7). Note that Practices A262 requires the test to be performed on sensitized specimens in the low-carbon and stabilized types and on specimens representative of the as-shipped condition for other types. In the case of low-carbon types containing 3 % or more molybdenum, the applicability of the sensitizing treatment prior to testing shall be a matter for negotiation between the seller and the purchaser.
D Quenched in water or rapidly cooled by other means.
7. Chemical Composition
7.1 The steel shall conform to the requirements as to chemical composition prescribed in Table 1.
8. Product Analysis
8.1 At the request of the purchaser, an analysis of one billet or one length of flat-rolled stock from each heat, or two pipes from each lot shall be made by the manufacturer. A lot of pipe shall consist of the following number of lengths of the same size and wall thickness from any one heat of steel:
| NPS Designator | Lengths of Pipe in Lot |
| Under 2 | 400 or fraction thereof |
| 2 to 5 | 200 or fraction thereof |
| 6 and over | 100 or fraction thereof |
8.2 The results of these analyses shall be reported to the purchaser or the purchaser’s representative, and shall conform to the requirements specified in Section 7.
8.3 If the analysis of one of the tests specified in 8.1 does not conform to the requirements specified in Section 7, an analysis of each billet or pipe from the same heat or lot may be made, and all billets or pipe conforming to the requirements shall be accepted.
9. Permitted Variations in Wall Thickness
9.1 In addition to the implicit limitation of wall thickness for seamless pipe imposed by the limitation on weight in Specification A999/A999M, the wall thickness for seamless and welded pipe at any point shall be within the tolerances specified in Table 3, except that for welded pipe the weld area shall not be limited by the “Over” tolerance. The wall thickness and outside diameter for inspection for compliance with this requirement for pipe ordered by NPS and schedule number is shown in Table X1.1.
TABLE 3 Permitted Variations in Wall Thickness
| NPS Designator | Tolerance, % from Nominal | |
| Over | Under | |
| 1 ⁄ 8 to 2 1 ⁄ 2 incl., all t/D ratios | 20.0 | 12.5 |
|
3 to 18 incl., t/D up to 5 % incl. |
22.5 | 12.5 |
|
3 to 18 incl., t/D > 5 % 20 and larger, welded, |
15.0 | 12.5 |
| all t/D ratios 20 and larger, | 17.5 | 12.5 |
|
seamless, t/D up to 5 % incl. 20 and larger, |
22.5 | 12.5 |
| seamless, t/D > 5 % | 15.0 | 12.5 |
where:
t = Nominal Wall Thickness
D = Ordered Outside Diameter
10. Tensile Requirements
10.1 The tensile properties of the material shall conform to the requirements prescribed in Table 4.
TABLE 4 Tensile Requirements


11. Mechanical Tests, Grain Size Determinations, and Weld Decay Tests Required
11.1 Mechanical Testing Lot Definition—The term lot for mechanical tests shall be as follows:
11.1.1 Where the final heat treated condition is obtained,consistent with the requirements of 6.2, in a continuous furnace, by quenching after hot forming or in a batch-type furnace equipped with recording pyrometers and automatically controlled within a 50 °F [30 °C] or lesser range, the term lot for mechanical tests shall apply to all pipes of the same specified outside diameter and specified wall thickness (or schedule) that are produced from the same heat of steel and subjected to the same finishing treatment within the same operating period.
11.1.2 Where the final heat treated condition is obtained,consistent with the requirements of6.2, in a batch-type furnace not equipped with recording pyrometers and automatically controlled within a 50 °F [30 °C] or lesser range, the term lot shall apply to the larger of: (a) each 200 ft [60 m] or fraction thereof and (b) those pipes heat treated in the same furnace batch charge for pipes of the same specified outside diameter and specified wall thickness (or schedule) that are produced from the same heat of steel and are subjected to the same finishing temperature within the same operating period.
11.2 Transverse or Longitudinal Tension Test—One tension test shall be made on a specimen for lots of not more than 100 pipes. Tension tests shall be made on specimens from two tubes for lots of more than 100 pipes.
11.3 Flattening Test—For material heat treated in a continuous furnace, by quenching after hot forming or in a batch-type furnace equipped with recording pyrometers and automatically controlled within a 50 °F [30 °C] or lesser range, flattening tests shall be made on a sufficient number of pipe to constitute 5 % of the lot, but in no case less than 2 lengths of pipe. For material heat treated in a batch-type furnace not equipped with recording pyrometers and automatically controlled within a 50 °F [30 °C] or lesser range, flattening tests shall be made on 5 % of the pipe from each heat treated lot.
11.3.1 For welded pipe a transverse-guided face bend test of the weld may be conducted instead of a flattening test in accordance with the method outlined in the steel tubular product supplement ofTest Methods and Definitions A370. For welded pipe with a specified wall thickness over 3 ⁄ 8 in., twoside bend tests may be made instead of the face bend test. The ductility of the weld shall be considered acceptable when there is no evidence of cracks in the weld or between the weld and the base metal after bending. Test specimens from 5 % of the lot shall be taken from the pipe or test plates of the same material as the pipe, the test plates being attached to the end of the cylinder and welded as a prolongation of the pipe longitudinal seam.
11.4 Grain Size—Grain size determinations, in accordance with Test Methods E112, shall be made on the grades listed in Table 5. Grain size determinations shall be made on each heat treatment lot, as defined in 11.1, for the same number of pipes as prescribed for the flattening test in 11.3. The grain size results shall conform to the requirements prescribed in Table 5.
TABLE 5 Grain Size Requirements
| Grade | UNS Designation | Grain Size |
| . . . | N08810 | 5 or coarser |
| . . . | N08811 | 5 or coarser |
| TP304H | S30409 | 7 or coarser |
| TP309H | S30909 | 6 or coarser |
| TP309HCb | S30940 | 6 or coarser |
| TP310H | S31009 | 6 or coarser |
| . . . | S31035 | 7 or coarser |
| TP310HCb | S31041 | 6 or coarser |
| TP316H | S31609 | 7 or coarser |
| TP321H | S32109 | 7 or coarser |
| . . . | S32615 | 3 or finer |
| TP347H | S34709 | 7 or coarser |
| TP348H | S34809 | 7 or coarser |
11.5 HCW pipe shall be capable of passing the weld decay tests listed in Supplementary S9 with a weld metal to base metal loss ratio of 0.90 to 1.1. The test is not required to be performed unless S9 is specified in the purchase order.
12. Hydrostatic or Nondestructive Electric Test
12.1 Each pipe shall be subjected to the nondestructive electric test or the hydrostatic test. The type of test to be used shall be at the option of the manufacturer, unless otherwise specified in the purchase order.
12.2 The hydrostatic test shall be in accordance with Specification A999/A999M, unless specifically exempted under the provisions of 12.3.
12.3 For pipe whose dimensions equal or exceed NPS10, the purchaser, with the agreement of the manufacturer, is permitted to waive the hydrostatic test requirement when in lieu of such test the purchaser performs a system test. Each length of pipe furnished without the completed manufacturer’s hydrostatic test shall include with the mandatory markings the letters “NH.”
12.4 The nondestructive electric test shall be in accordance with Specification A999/A999M.
13. Lengths
13.1 Pipe lengths shall be in accordance with the following regular practice:
13.1.1 Unless otherwise agreed upon, all sizes from NPS 1 ⁄ 8 to and including NPS 8 are available in a length up to 24 ft with the permitted range of 15 to 24 ft. Short lengths are acceptable and the number and minimum length shall be agreed upon between the manufacturer and the purchaser.
13.1.2 If definite cut lengths are desired, the lengths required shall be specified in the order. No pipe shall be under the specified length and no pipe shall be more than 1 ⁄ 4 in. [6 mm] over the specified length.
13.1.3 No jointers are permitted unless otherwise specified.
14. Workmanship, Finish, and Appearance
14.1 The finished pipes shall be reasonably straight and shall have a workmanlike finish. Removal of imperfections by grinding is permitted, provided the wall thicknesses are not decreased to less than that permitted in the Permissible Variations in Wall Thickness section of Specification A999/A999M.
15. Repair by Welding
15.1 For welded pipe whose diameter equals or exceeds NPS 6, and whose nominal wall thickness equals or exceeds 0.200, it is permitted to make weld repairs to the weld seam with the addition of compatible filler metal using the same procedures specified for plate defects in the section on Repair by Welding of Specification A999/A999M.
15.2 Weld repairs ofthe weld seam shall not exceed 20 % of the seam length.
15.3 Weld repairs shall be made only with the gas tungstenarc welding process using the same classification of bare filler rod qualified to the most currentAWS SpecificationA5.9 as the grade of stainless steel pipe being repaired and as shown in Table 6. Alternatively, subject to approval by the purchaser, weld repairs shall be made only with the gas tungsten-arc welding process using a filler metal more highly alloyed than the base metal when needed for corrosion resistance or other properties.
15.4 Pipes that have had weld seam repairs with filler metal shall be uniquely identified and shall be so stated and identified on the certificate of tests. When filler metal other than that listed in Table 6 is used, the filler metal shall be identified on the certificate of tests.
TABLE 6 Pipe and Filler Metal Specification


16. Certification
16.1 In addition to the information required by Specification A999/A999M, the certification shall state whether or not the material was hydrostatically tested. If the material was nondestructively tested, the certification shall so state and shall state which standard practice was followed and what reference discontinuities were used.
17. Marking
17.1 In addition to the marking specified in Specification A999/A999M, the marking shall include the NPS (nominal pipe size) or outside diameter and schedule number or average wall thickness, heat number, and NH when hydrotesting is not performed and ET when eddy-current testing is performed or UT when ultrasonic testing is performed. The marking shall also include the manufacturer’s private identifying mark, the marking requirement of 12.3, if applicable, and whether seamless (SML), welded (WLD), or heavily cold-worked (HCW). For Grades TP304H, TP316H, TP321H, TP347H,TP348H, and S30815, the marking shall also include the heat number and heat-treatment lot identification. If specified in the purchase order, the marking for pipe larger than NPS 4 shall include the weight.
18. Government Procurement
18.1 Scale Free Pipe for Government Procurement:
18.1.1 When specified in the contract or order, the following requirements shall be considered in the inquiry, contract or order, for agencies of the U.S. Government where scale free pipe or tube is required. These requirements shall take precedence if there is a conflict between these requirements and the product specifications.
18.1.2 The requirements of Specification A999/A999M for pipe and Specification A1016/A1016M for tubes shall be applicable when pipe or tube is ordered to this specification.
18.1.3 Pipe and tube shall be one of the following grades as specified herein:
| Grade | UNS Designation |
| TP304 | S30400 |
| TP304L | S30403 |
| TP304N | S30451 |
| TP316 | S31600 |
| TP316L | S31603 |
| TP316N | S31651 |
| TP317 | S31700 |
| TP317L | S31703 |
| TP321 | S32100 |
| TP347 | S34700 |
18.1.4 Part Number:
Example: ASTM A312/A312M Pipe 304 NPS 12 SCH 40S SMLS
| Specification Number | ASTM A312 |
| Pipe | P |
| Grade | 304 |
| NPS | 12 |
| Wall | 0.375 |
| SMLS OR WELDED | SML |
18.1.4.1
| Specification Number | ASTM A312 |
| Tube | T |
| Grade | 304 |
| Outside Diameter | 0.250 |
| Wall | 0.035 |
| SMLS OR WELDED | WLD |
18.1.5 Ordering Information—Orders for material under this specification shall include the following in addition to the requirements of Section 4:
18.1.5.1 Pipe or tube,
18.1.5.2 Part number,
18.1.5.3 Ultrasonic inspection, if required,
18.1.5.4 If shear wave test is to be conducted in two opposite circumferential directions,
18.1.5.5 Intergranular corrosion test, and
18.1.5.6 Level of preservation and packing required.
19. Keywords
19.1 austenitic stainless steel; seamless steel pipe; stainless steel pipe; steel pipe; welded steel pipe
